|
|
Connection Setup with SQLiteLinkedPOS Express is using SQLite as its database engine thus making it possible to create a one click installation and zero configuration deployment. Simply install and start using LinkedPOS Express without any type of configurations. However, LinkedPOS Professional can also be connected to SQLite but in this case it will work as a standalone. Sales Terminals will not be able to connect to the internal database. When LinkedPOS Express is started for the first time, the database does not exist and LinkedPOS Express itself creates a database under the "Installation Directory->Data" folder. No configuration is required. However if due to any reason the database is required to be moved to any other location then the following instructions can be used to configure connection. 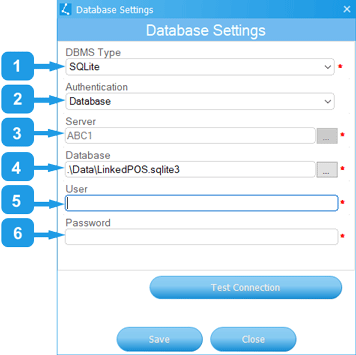
1 :The default DBMS type (Database Management System Type) is SQLite but it can be changed to Microsoft SQL Server by choosing one of the options displayed in dropdown list as shown in the image below:- 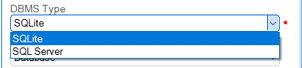
2 : Default Authentication for connecting to database is Database. Since SQLite supports database authentication only therefore other options are not valid. All available options can be observed in the below image:- 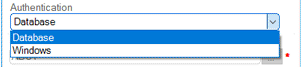
3 : SQLite is embedded into the database with zero footprints. That's why it can run on the local computer only and the Server is local the computer's name and cannot be changed. 
4 : Database name must be provided. Default database is "Installation Directory->Data->LinkedPOS.sqlite3" but it can be changed to any other name and location. On startup, LinkedPOS will check for tables and if tables are not found, then LinkedPOS will create the tables. 
5 : No User is required to connect to SQLite database. Leave it blank. 
6 : No Password is required to connect to SQLite database. Leave it blank. 
When the information mentioned above is provided, then validate this information by pressing the |
 button and all discovered instances will be displayed in the dropdown list. Simply select the target instance
and press the OK button. Connection success or failure messages will be displayed accordingly. If the test connection
is successful, then press the
button and all discovered instances will be displayed in the dropdown list. Simply select the target instance
and press the OK button. Connection success or failure messages will be displayed accordingly. If the test connection
is successful, then press the  and connection information will be permanently stored. For closing the connection dialog press the
  button.