Common Functionality
In order to make user experience simple, uniform & consistent with LinkedPOS, there are certain operations that have the same concept everywhere. These operations are explained in subsequent paragraphs.
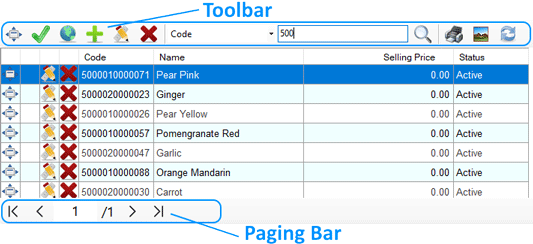
Toolbar
The image above shows all options that are available on one table. Based on the type of contents of the table, visible options may be less but the type of operation behind each toolbar button is the same. Each option is explained below:-
 View
button opens up the highlighted record in a separate window as read-only.
View
button opens up the highlighted record in a separate window as read-only.
 OK
button is usually visible on lookup tables. When this button is clicked, it means the highlighted
record is the choice for further action.
OK
button is usually visible on lookup tables. When this button is clicked, it means the highlighted
record is the choice for further action.
 Select All
button is usually visible on lookup tables. When this button is clicked, all records available in the table
are selected for further action.
Select All
button is usually visible on lookup tables. When this button is clicked, all records available in the table
are selected for further action.
 Online
button is visible on tables where online resources are available and can be downloaded.
Online
button is visible on tables where online resources are available and can be downloaded.
 New
button is visible on the majority of the tables and clicking it opens up a window for adding new objects such as
items, quotations, customers, suppliers and much more.
New
button is visible on the majority of the tables and clicking it opens up a window for adding new objects such as
items, quotations, customers, suppliers and much more.
 Modify
button is visible on the majority of the tables. Clicking on a row in the table and then pressing this button
opens up a window with full details of the highlighted item and allows for modification of its values.
Modify
button is visible on the majority of the tables. Clicking on a row in the table and then pressing this button
opens up a window with full details of the highlighted item and allows for modification of its values.
 Delete
button is the least visible button on the tables because most of the data cannot be deleted. Clicking on a row in the table
and then pressing this button will delete the record permanently.
Delete
button is the least visible button on the tables because most of the data cannot be deleted. Clicking on a row in the table
and then pressing this button will delete the record permanently.
 Print
button is the least visible button on the tables. Pressing this button prints currently displayed records in the table.
Print
button is the least visible button on the tables. Pressing this button prints currently displayed records in the table.
 Show Images
button represents a powerful feature of the tables for showing the images of records displayed in the table. For example,
if pressed on the items table, then, the images of items are displayed in the table.
Show Images
button represents a powerful feature of the tables for showing the images of records displayed in the table. For example,
if pressed on the items table, then, the images of items are displayed in the table.
 Refresh
button reloads the current page from the database.
Refresh
button reloads the current page from the database.
 Search
toolbar is the most powerful feature of LinkedPOS that can be used to filter the data of tables
as per requirements. First control of this bar is the dropdown list of columns names displayed in the table.
Select the column name from this dropdown list and then enter the full or partial text in the next text box and press
the search button. For text-type columns, partial information can be entered, while in the case of date-time columns,
starting and ending date ranges can be selected.
Search
toolbar is the most powerful feature of LinkedPOS that can be used to filter the data of tables
as per requirements. First control of this bar is the dropdown list of columns names displayed in the table.
Select the column name from this dropdown list and then enter the full or partial text in the next text box and press
the search button. For text-type columns, partial information can be entered, while in the case of date-time columns,
starting and ending date ranges can be selected.
 Mandatory Field
marker appears beside certain fields which hints that the adjacent field must be completed before proceeding further.
Mandatory Field
marker appears beside certain fields which hints that the adjacent field must be completed before proceeding further.
Paging Bar Of Tables
Most tables of LinkedPOS have a paging bar at the bottom of each table. This helps in navigating from page to page.
 First Page
button will load the first page of table irrespective of the current page number and helps in quick navigation.
First Page
button will load the first page of table irrespective of the current page number and helps in quick navigation.
 Previous Page
button will load the previous page relative to the current page number in numerical order. If the current page is the first
page then it will not do anything.
Previous Page
button will load the previous page relative to the current page number in numerical order. If the current page is the first
page then it will not do anything.
 Current Page Number/Total Pages
displays the currently active page number and the total number of pages against the currently
entered search criteria.
Current Page Number/Total Pages
displays the currently active page number and the total number of pages against the currently
entered search criteria.
 Next Page
button will load the next page relative to the current page number in numerical order. If the current page is the last page, then
it will do nothing.
Next Page
button will load the next page relative to the current page number in numerical order. If the current page is the last page, then
it will do nothing.
 Last Page
button will load last page of the table irrespective to the current page number and helps in quick navigation.
Last Page
button will load last page of the table irrespective to the current page number and helps in quick navigation.
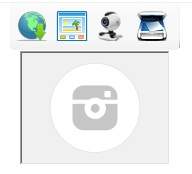
Image/Picture Capture
There are quite a few entities in LinkedPOS that support adding images along with other details. For example, items, products, customers, suppliers etc. This control is visible to help in a variety of ways. Each possbility is explained below:-
 Download
button is always visible but it is enabled in very few places. This button is enabled at places where
related images are available online. For example when adding new item/product, free images of items/products
can be downloaded from an existing stock of images. Pressing this button will display a list of images. Simply
click on the image and then press the
OK button. Online images are already optimized for direct usage.
Download
button is always visible but it is enabled in very few places. This button is enabled at places where
related images are available online. For example when adding new item/product, free images of items/products
can be downloaded from an existing stock of images. Pressing this button will display a list of images. Simply
click on the image and then press the
OK button. Online images are already optimized for direct usage.
 Browse
button pops open the file dialog and allows the user to select PNG, JPG or JPEG format images from the local computer.
Browse
button pops open the file dialog and allows the user to select PNG, JPG or JPEG format images from the local computer.
 Capture From WebCam
This is one of the most powerful features of LinkedPOS that helps capture images/pictures directly from a
webcam attached with the computer. Clicking on this button will pop up the image capture dialog.
Capture From WebCam
This is one of the most powerful features of LinkedPOS that helps capture images/pictures directly from a
webcam attached with the computer. Clicking on this button will pop up the image capture dialog.
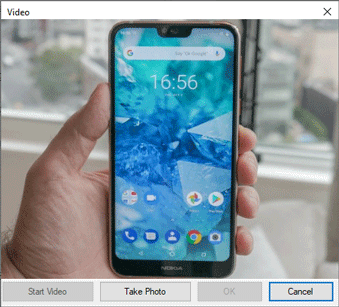
Press the  button to start
viewing a preview from the webcam. When the view is settled, then Press the
button to start
viewing a preview from the webcam. When the view is settled, then Press the  and this action will capture the current frame from the webcam preview as a picture.
 Scan From Scanner
This is another powerful feature of LinkedPOS that helps in capturing images/pictures directly from a
Scanner.
Scan From Scanner
This is another powerful feature of LinkedPOS that helps in capturing images/pictures directly from a
Scanner.
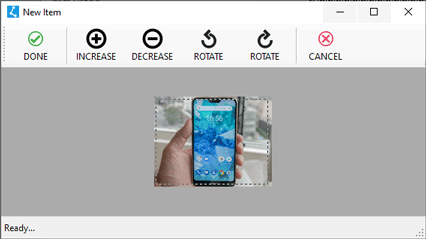
Cropping Image This is another powerful feature of LinkedPOS that helps in cropping a portion of an image/picture that is required. When an image/picture is browsed, captured from a webcam or scanned from a scanner, it will be opened in the image editor as shown in the image below. A variety of operations like zooming in, zooming out, rotating clockwise and anti-clockwise can be applied. And finally a marker rectangle can be moved on the image to focus on the part of image that is required to be cropped. Finally, click on the DONE button and the cropped image will be placed in the image control.